In accidents where you are the medical responder attending to someone with a spine injury, you are required to stabilize a patient’s head in the pre-hospital phase of care. Manually stabilize a patient’s head is a very important part in our emergency medical responder and first responder training.
There are various methods that can be used to stabilize the head and neck of the injured individual. Keep in mind that goal is to minimize the movement of head and neck in order to prevent damage to the spine and spinal cord.
There are specific guidelines that need to be followed to determine if the best course of action is to stabilize a patient’s head; this guideline is called the Canadian C-spine Rule. Once you, as the professional responder, have determined that stabilization of the head and neck is required, you may choose from of the following techniques, depending on the situation, to stabilized and minimize the movement of head and neck.
Importance of Head Grip for applying a Cervical Collar
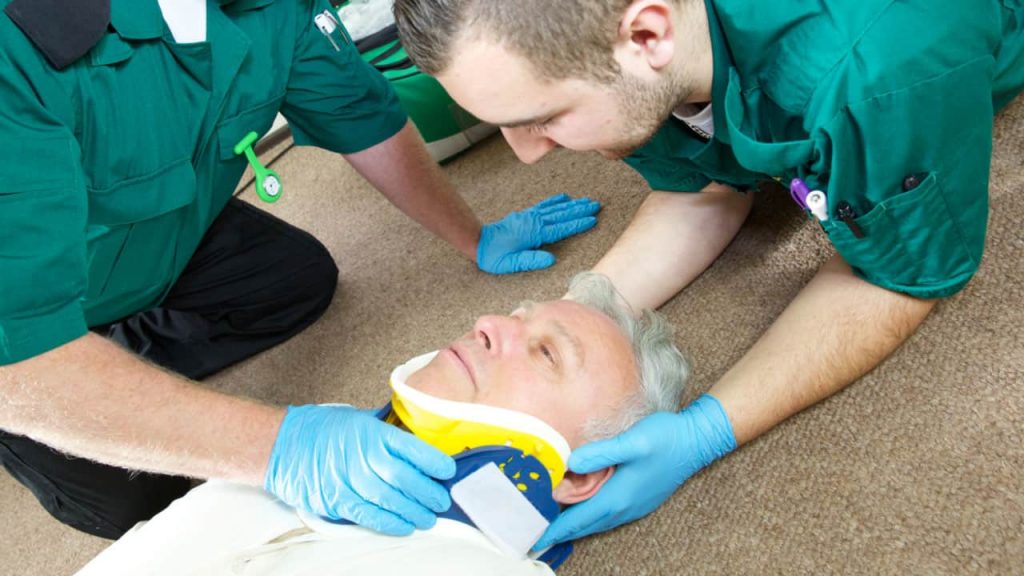
The head grip is the preferred maneuver to stabilize a patient’s head in order to apply a cervical collar. There are a few basic steps that you will need to apply:
1. With the patient in a supine position, face the person’s chest and kneel behind their head.
2. With your elbows on the ground, place your hands on either side of their head making sure that your fingers don’t extend past their ears.
3. The correct position for your fingers is:
- Thumbs on the forehead
- Index and middle fingers on the cheekbones
- Ring and little fingers below the ears
4. If the patient’s airway needs to be manipulated, move your index and middle fingers to the angle of the jaw. Displace the lower jaw (mandible) updwards as you maintin the position of the head in the neutral position.

Source: The Canadian Red Cross Societies; Emergency Care for Professional Responders, © 2018
Learn about First Aid Training you might need
Get first aid trained and acquire skills to assist someone with your life-saving skills as you complete the course with us. Call our toll-free number to know more.
When is the Trapezius Squeeze necessary and how is it done?
In cases where you must stabilize a patient’s head for longer, you can prevent fatigue in your hands by using the trapezius squeeze. It is also known as trap stabilization. The trapezius squeeze is also used when you need to roll the patient from the supine to the lateral position (modified trapezius squeeze). This is necessary if the patient is vomiting or is in pain in the supine position.
The steps for performing a trapezius squeeze are:
- Maintain alignment with the patient’s body as you kneel behind their head.
- With your elbows on the ground or your knees, slide your arms on the trapezius muscles of the patient on either side of their head.
- Your thumbs must be pointed downwards on the front of the patient’s trapezius muscles, and your fingers must be parallel to the spine on the back. Don’t cradle the patient’s neck with your hands.
- Without lifting the patient’s head, move your forearms inwards to support their head.
- Keep their head in a neutral position and apply firm pressure to maintain the support.
Source: The Canadian Red Cross Societies; Emergency Care for Professional Responders, © 2018
Register for First Aid & CPR Training
Applying the Sternal/Spinal Grip
When the patient is seated, you can perform a sternal/spinal grip when you stabilize a patient’s head.
This is done as follows:
1. Kneeling at a right angle at the patient’s side, place the elbow and forearm along their sternum.
2. The hand of that arm is placed as follows:
- Thumb on one cheekbone or mandible
- Index and middle fingers on the other cheekbone or mandible
3. At the same time, your other arm is positioned along the patient’s spine, and you support their head by gripping it with your hand.

Source: The Canadian Red Cross Societies; Emergency Care for Professional Responders, © 2018
Registering for a Professional Responder Course
Professional Responder training courses through Coast2Coast such as First Responder and Emergency Medical Responder both include training which covers the multiple ways to stabilize a patient’s head. Our Professional Responder courses are part of our advanced training meant for those who are/wish to work in a first responder role. After completing a training course, students will receive a WSIB approved Canadian Red Cross certificate which is valid for three years.
Registration is easy! Simply visit our website and choose the level of training you wish to enroll in. From there, you may select the date and location of your training. Our Professional Responder courses are offered in multiple locations including Toronto, North York, London and Hamilton! Register today, save a life tomorrow.













No comment yet, add your voice below!